|
|
||
|---|---|---|
| .. | ||
| advanced_https_ota | ||
| native_ota_example | ||
| otatool | ||
| simple_ota_example | ||
| OTA_workflow.png | ||
| README.md | ||
OTA Demo
Introduction
Over The Air (OTA) updates can be performed in esp32 in two ways:
- Using native APIs which are part of OTA component.
- Using simplified APIs which are part of
esp_https_ota, it's an abstraction layer over OTA APIs to perform updates using HTTPS.
Both these methods are demonstrated in OTA Demo under native_ota_example and simple_ota_example respectively.
Note: This guide is common for both the examples
Aim
An app running on ESP32 can upgrade itself by downloading a new app "image" binary file, and storing it in flash.
In this example, the ESP32 has 3 images in flash: factory, OTA_0, OTA_1. Each of these is a self-contained partition. The number of OTA image partition is determined by the partition table layout.
Flashing the example over serial with "make flash" updates the factory app image. On first boot, the bootloader loads this factory app image which then performs an OTA update (triggered in the example code). The update downloads a new image from a HTTPS server and saves it into the OTA_0 partition. At this point the example code updates the ota_data partition to indicate the new app partition, and resets. The bootloader reads ota_data, determines the new OTA image has been selected, and runs it.
Workflow
The OTA_workflow.png diagram demonstrates the overall workflow:
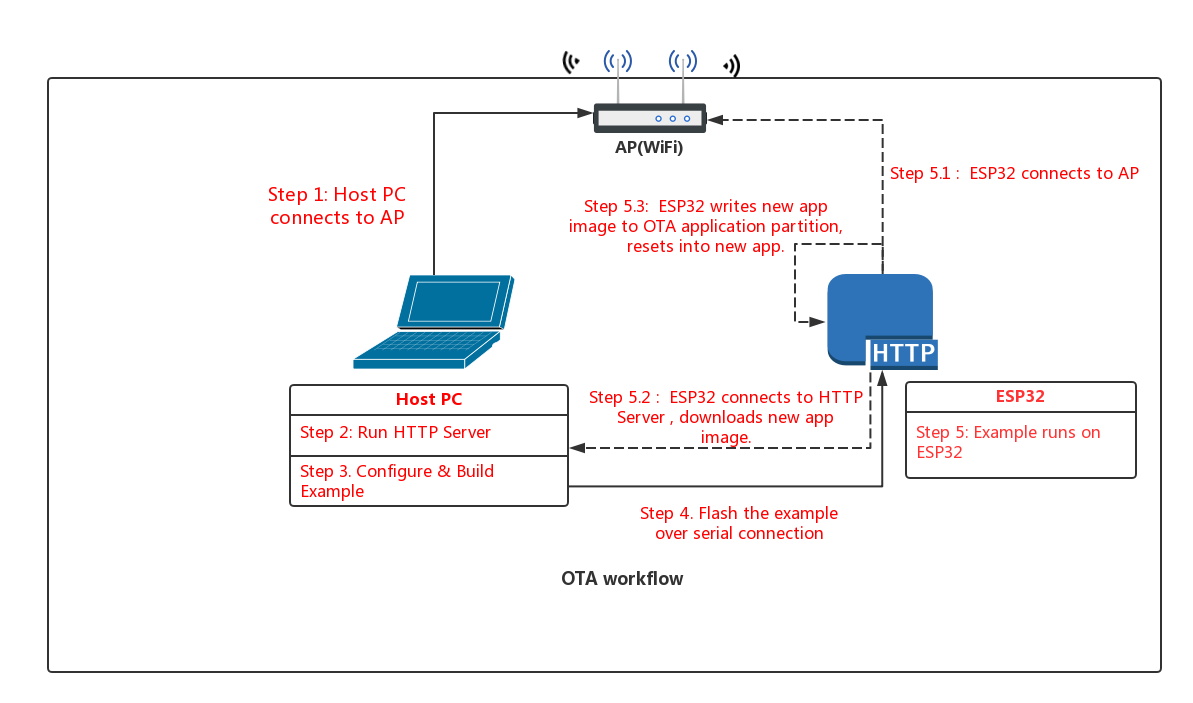
Step 1: Connect to AP
Connect your host PC to the same AP that you will use for the ESP32.
Step 2: Run HTTPS Server
For our upgrade example OTA file, we're going to use the get-started/hello_world example.
Open a new terminal to run the HTTP server, then run these commands to build the example and start the server:
Build the example:
cd $IDF_PATH/examples/get-started/hello_world
make
cd build
Generate self-signed certificate and key:
NOTE: Common Name of server certificate should be host-name of your server.
openssl req -x509 -newkey rsa:2048 -keyout ca_key.pem -out ca_cert.pem -days 365
Copy the certificate to server_certs directory inside OTA example directory:
cp ca_cert.pem /path/to/ota/example/server_certs/
Start the HTTPS server:
openssl s_server -WWW -key ca_key.pem -cert ca_cert.pem -port 8070
NB: You've probably noticed there is nothing special about the "hello world" example when used for OTA updates. This is because any .bin app file which is built by esp-idf can be used as an app image for OTA. The only difference is whether it is written to a factory partition or an OTA partition.
If you have any firewall software running that will block incoming access to port 8070, configure it to allow access while running the example.
Step 3: Build OTA Example
Change back to the OTA example directory, and type make menuconfig to configure the OTA example. Under the "Example Configuration" submenu, fill in the following details:
- WiFi SSID & Password
- Firmware Upgrade URL. The URL will be look like this:
https://<host-ip-address>:<host-port>/<firmware-image-filename>

for e.g,
https://192.168.0.3:8070/hello-world.bin
Save your changes, and type make to build the example.
Step 4: Flash OTA Example
When flashing, use the make flash to flash the factory image. This command will find if partition table has ota_data partition (as in our case) then ota_data will erase to initial.
It allows to run the newly loaded app from a factory partition.
make flash
After first update, if you want to return back to factory app (or the first OTA partition, if factory partition is not present) then use the command make erase_otadata.
It erases the ota_data partition to initial state. Take note that this assumes that the partition table of this project is the one that is on the device.
Step 5: Run the OTA Example
When the example starts up, it will print "Starting OTA example..." then:
- Connect to the AP with configured SSID and password.
- Connect to the HTTP server and download the new image.
- Write the image to flash, and configure the next boot from this image.
- Reboot
Support the rollback
This feature allows you to roll back to the previous firmware if the app is not operable. Option :ref:CONFIG_APP_ROLLBACK_ENABLE allows you to track the first boot of the application (see theOver The Air Updates (OTA) article).
For native_ota_example, added a bit of code to demonstrate how a rollback works. To use it, you need enable the :ref:CONFIG_APP_ROLLBACK_ENABLE option in Kconfig and under the "Example Configuration" submenu to set "Number of the GPIO input for diagnostic" to manage the rollback process.
To trigger a rollback, this GPIO must be pulled low while the message Diagnostics (5 sec)... which will be on first boot.
If GPIO is not pulled low then the operable of the app will be confirmed.
Support the version of application
For native_ota_example, code has been added to demonstrate how to check the version of the application and prevent infinite firmware updates. Only the application with the new version can be downloaded. Version checking is performed after the very first firmware image package has been received, which contains data about the firmware version. The application version can be taken from three places:
- If
PROJECT_VERvariable set in project Cmake/Makefile file, its value will be used. - Else, if the
$PROJECT_PATH/version.txtexists, its contents will be used asPROJECT_VER. - Else, if the project is located inside a Git repository, the output of
git describewill be used. - Otherwise,
PROJECT_VERwill be "1".
In native_ota_example, $PROJECT_PATH/version.txt is used to define the version of app. Change the version in the file to compile the new firmware.
Troubleshooting
- Check your PC can ping the ESP32 at its IP, and that the IP, AP and other configuration settings are correct in menuconfig.
- Check if any firewall software is preventing incoming connections on the PC.
- Check whether you can see the configured file (default hello-world.bin), by checking the output of following command:
curl -v https://<host-ip-address>:<host-port>/<firmware-image-filename>
- If you have another PC or a phone, try viewing the file listing from the separate host.
Error "ota_begin error err=0x104"
If you see this error then check that the configured (and actual) flash size is large enough for the partitions in the partition table. The default "two OTA slots" partition table only works with 4MB flash size. To use OTA with smaller flash sizes, create a custom partition table CSV (look in components/partition_table) and configure it in menuconfig.
If changing partition layout, it is usually wise to run "make erase_flash" between steps.